Hi everybody! Today's post is all about a recreation of an old favourite mani of mine. The original was done about two years and you can read and see all about it right here! I absolutely loved that design and recently I was going through some old photos and came across it again and decided to recreate it and kind of update it a bit.
This time round I used Sour Grape by Ulta3 and the same glitter polish, Silver Gleam by Maybelline, as well as Snow Me White by Sinful Colors.
I did a gradient and only used the purple to do the leopard print as opposed to using the colour and then black polish to outline. I think it looks simpler and neater and you can fit more pattern onto the nail.
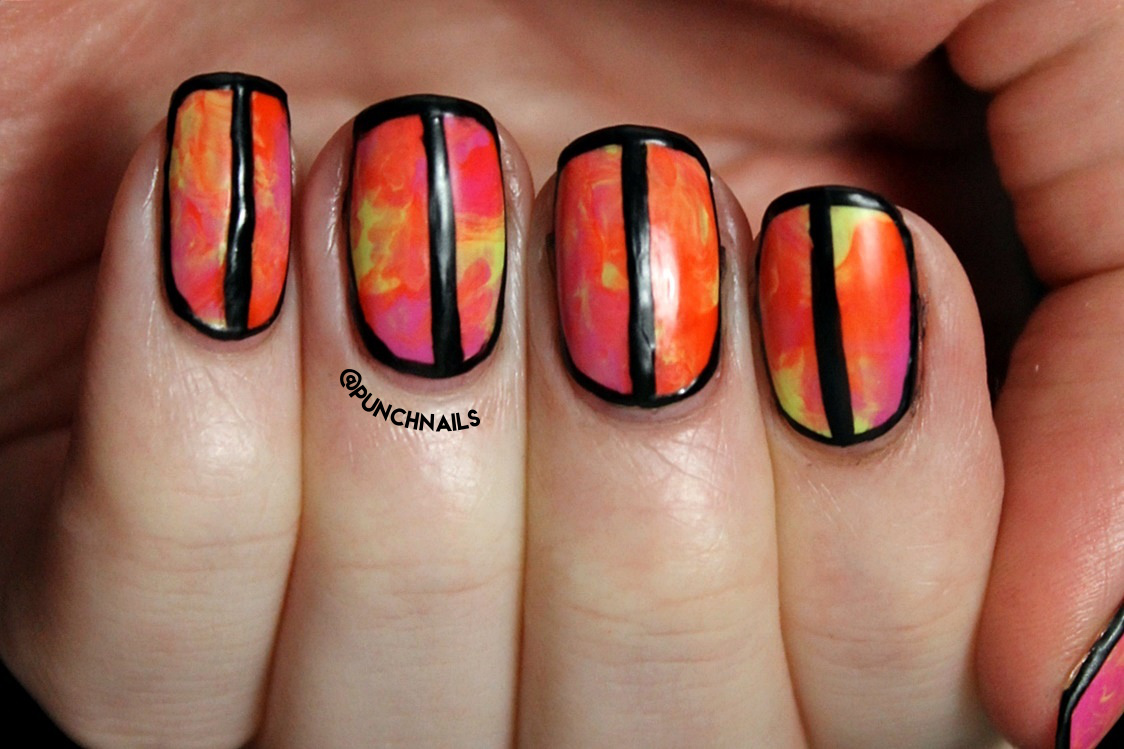
I really love how this turned out compared to the original, not a bad upgrade! The original is definitely still one of my favourite designs though but it's nice to recreate something like this and I might consider going back and redoing some older designs every so often.
Thanks for reading!
- Melissa.
Showing posts with label ulta3. Show all posts
Saturday, February 27, 2016
Sunday, February 14, 2016
Valentine's Day Nail Art
Good morning everyone! As it's Valentine's Day today, I thought I'd do some nail art to coincide. I'm not someone who celebrates the day or has a lot of thoughts towards it because in the end it's just a day and people can do as they please with days like this. But despite my neutral thoughts towards it, I still felt inspired to do some nail art based around it. It also helped to force me to do some more stamping as the idea I had involved just that.
I actually ended up doing some reverse stamping and creating a decal using my Uber Chic Beauty Mat (there's a bunch of tutorials out there if you want to learn how to do it). The stamping didn't transfer as solidly as I would've liked and I was going to fix up the black outline but when I applied it to my nail I liked how it looked as if it'd been drawn on a bit roughly and quickly. So I'm very happy with how the accent nail turned out. I think it's pretty cute. The polishes I used were Snow Me White - Sinful Colors, Black Out - Sally Hansen, Sour Grape, and Fairy Floss both by Ulta3.
The other nails are a base of Snow & Ice by Savvy, top coated with Don't Violet Me Down, and Be Magentale With Me, both OPI Sheer Tints. I applied them in a sort of diagonal gradient way, but that doesn't show up too much on camera. It's there though, trust me.
I'm genuinely really happy with how these turned out. A lot better than what I had planned in my head.
That's all for today, I hope everyone has a lovely Sunday!
Thanks for reading.
- Melissa.
Saturday, February 13, 2016
Mermaid Scale Nail Art - Born Pretty Store Review
*This product was sent to me for review, all opinions are my own
I tried out these nail stickers which essentially are the same as all the nail vinyls and stencils that are really popular in the nail art world, so they work the same way. I completely forgot to take progress shots throughout this mani so apologies for that but I'll explain how I used them anyway!
I started with a base colour and applied a quick drying top coat over it so I could use the stencils sooner than if I didn't apply one. As they were stuck down on a plastic sheeting and were quite thin and sticky I was really worried that once I pulled the stencil off my nail, it'd pull all the polish up with it. Thankfully it didn't, but I still stuck the sticker flat on my hand to remove some of the stickiness before applying it to my nail. I think it helped a little bit.
Once the sticker was applied I then sponged on the four polishes I'd chosen to use which were: Berry Blue, Corsican Rose, Violet Rumble all by Ulta3, and Darling, You Are Fabulous! By Maybelline, which was the gold polish. I'm not a huge gold polish fan because I don't think it suits me, but this one is growing on me a bit!
Once I had done two quick coats of the sponged polish, I then carefully peeled the sticker off and up until this point I'd had huge doubts as to whether it'd work that well. But it turned out amazingly and I love it. Made me wish I'd done all the nails instead of just an accent.
I know that the photo below is super blurry, but since I'd forgotten to take progress shots I wanted to showcase the stencils themselves and didn't realise how blurry this photo was until after I'd removed the design, so oops! But look how gorgeous the stickers are! I love just looking at them.
I enjoy how they turned out because I've wanted to try this kind of design for a while but can't justify spending so much on other brands of nail vinyls because shipping isn't cheap to Australia from indie brands, so I'm glad I found these!
There are just one design of the many stencils/vinyls that Born Pretty Store has on offer and they're incredibly affordable if you wish to give them a go to see what all the fuss about these kind of stencils are! And don't forget you can use my code MEPUK31 for 10% off at checkout!
Thanks for reading.
Labels:
born pretty store,
maybelline,
nail art,
nail vinyls,
review,
splatter,
ulta3
Thursday, December 03, 2015
Floral Decals - Born Pretty Store Review
*This product was sent to me for review, all opinions are my own
Today's review is on these gorgeous water decals from Born Pretty Store! The pack come with two different designs, so you've got a bit of choice on which decals you might want to wear or incorporate into your nail art!
I chose to use to purple geometric looking decals but only apply them to two nails as I wanted them to be a feature and not the whole design. But I also didn't want the other two nails to overtake the decals so I chose to pair them with Ulta3's Losta Fun which I think matched them quite well!
I used a white base under the decals as the non-coloured parts were clear and I wanted them to stand out on my nail. They were slightly difficult to apply though and it took me three tries to get a decal on my ring finger because it kept folding in on itself or not sitting straight on the nail and just all around wasn't working. I had no problem with the middle finger though! That one went on easily and it's my favourite design of the whole thing.
I really do love these decals, I wore them for about a week with only slight tip wear which is normal, and they were easy to remove with polish remover just like normal nail polish! As with the previous decals I posted about, they can be cut to the size of your nail or you can easily clean up the excess around the cuticles with some acetone.
Don't forget you can use my 10% discount code: MEPUK31 at checkout!
Thanks for reading.
- Melissa.
Labels:
born pretty store,
review,
ulta3,
water decals
Sunday, November 22, 2015
Pink Gradient Chevrons
Today I have some simple gradient chevrons to share with you! I wanted to do something easy but something that still looked like it took a lot of effort. I don't think I've ever done a gradient chevron pattern, but I could be wrong!
For this design I used this brand of nail vinyls (the normal website is down for maintenance) and then sponged a few pink polishes over the top of them to make the gradient. I used Hot Spring by Ulta3, Secret Story by Essie, and Fairy Floss by Ulta3.
I really like how these turned out, I probably could have done another coat but I was worried that would cause the polish to drag too much when I pulled the nail vinyls off.
Anyway, that's it for today because it's only simple and there's not much else to them!
- Melissa.
Sunday, November 08, 2015
Swirled Nail Art w/ Black Accents
Recently I've been wanting to do borders around my nail art but haven't had the right design that I thought would look good with it. So the other day I did some swirled/marble nail art using cut up sandwich bags and thought it'd be perfect to do some black borders around it!
I used Orange Fix, Chic Chartreuse, and Fuchsia Petal all by Maybelline Color Show. I smooshed all of those colours together with cut up bits of a sandwich bag and I really love how it turned out! The green comes across as more of a yellow when mixed with the other colours, but that's okay.
I then went in with Black Satin by Ulta3 and carefully did some borders around each nail, and then thought it'd look even better with a line down the middle of the nail. Not sure which ended up better but I only took photos of the end result and everyone who saw my nails while I was wearing them absolutely loved them!
I think it looks really cool and makes it even more eye-catching! I topped it with Revlon's Matte Top Coat but it didn't make them completely matte, only dulled them down a bit so I think I might need a new matte top coat!
- Melissa.
Labels:
matte,
maybelline,
nail art,
ulta3
Wednesday, September 09, 2015
31DC2015: Day 9 - Rainbow
Today's prompt is one of my favourites because it's such a fun one and it's always so bright and colourful and you can do a lot with so many colours! Last year's design from this prompt was one of my absolute favourites of the year so I knew I definitely wouldn't be able to top it. So I did a simple sponged mani with all the rainbow colours and tried my best to fit them all on my little nails!
All polishes I used were from Ulta3 and they are, in rainbow order, Pink Colada, Tangelo, Frangipani, Mojito, Blue Marlin, Spring Break.
While it didn't turn out the best because my nails are so short that I couldn't get all the colours on each one, it still fits the prompt and is very rainbow-y!
- Melissa.
Friday, September 04, 2015
31DC2015: Day 4 - Green
I wanted to do something new and different for today's prompt since the past few days haven't been anything special. I really like the look of fish scale/mermaid nail art and I thought today would be a great chance to do it as I have a huge variation of green polishes! The end result didn't turn out exactly like scales because as it turns out it's actually kind of hard to get all the dots the same size and to mix the colours around enough. But it's still really cool and I like the effect it has.
I used a bunch of Ulta3 colours for this one so if you want to know the name of a specific one that you like, leave a comment and I'll let you know! I'm glad I went with something different for today, even if my back did ache after doing it because of how long it took!
- Melissa.
I used a bunch of Ulta3 colours for this one so if you want to know the name of a specific one that you like, leave a comment and I'll let you know! I'm glad I went with something different for today, even if my back did ache after doing it because of how long it took!
- Melissa.
Tuesday, September 01, 2015
31DC2015: Day 1 - Red
Another year, another 31 Day Challenge! I don't have a lot of faith in myself to complete the challenge this year just because I'm busier but also somehow lazier than the past two years, but I'm going to give it a good go anyway because why the hell not!?
If you know me at all, you'll know I hate the colour red so I always start the challenge annoyed. But today I just did something very simple and easy and since it's been a while my photo taking skills were pretty average.
I used a base of Ulta3's Pepper Pot and then used Black Out by Sally Hansen for the dry brush method. It's not the greatest but I didn't really want to spend too much time on red. It only gets better from here on anyway!
- Melissa.
Labels:
31DC2015,
red,
sally hansen,
ulta3
Friday, July 31, 2015
Purple/Green/Blue Mix n Match
I have a random mix n match design to show you tonight. I started off with the idea of doing some chevron patterns with purple glitter and a purple gradient. But then I realise that I always do purple gradients so I chucked in a green and blue polish and once finished I realised again that I always use this colour scheme.
But anyway, I love how it ended up even though it wasn't my original plan (thanks to being too impatient for the polish to dry, causing the nail vinyls to imprint in my white base and then deciding I should do something else). I've probably done something similar to this because I'm a bit of a one trick pony, but it's something at least!
The base is Snow Me White by Sinful Colors, the lovely glitter is Lavender Sparks by Maybelline Color Show and the three colours are Pamplona Purple by OPI, Suzi Says Feng Shui by OPI and Emerald Inten-City by Ulta3. They all make for such a lovely combo and honestly, if it's not obvious the green/purple/blue colour scheme is one of my favourites to use on my nails. They just work so perfectly together!
That's it for tonight, thanks for reading!
- Melissa.
Labels:
dotticure,
glitter,
maybelline,
mix n match,
nail art,
opi,
sinful colors,
ulta3
Monday, July 20, 2015
Watermelon Nail Art
I have a quick post tonight to show you some watermelon nail art I did over the weekend! It's nothing special and I don't really love them that much; they definitely could be better but they're still fun and it's my first time doing this design, so I can only improve from here, right?
The red base is Pink Colada by Ulta3, the dark green is Don't Mess With OPI by OPI, the white is Snow Me White by Sinful Colors and the lighter green is a mix of the OPI shade and Mojito Madness by Essie.
I think next time I would use a lighter shade of pink but I know that this colour would be perfect for some strawberry nail art!
Thanks for reading!
- Melissa.
Labels:
essie,
fruit nail art,
nail art,
opi,
sinful colors,
ulta3
Monday, July 06, 2015
Kiwi Fruit Nail Art
I have a quick post tonight on these kiwi fruit nails that I did on a whim last week. I recently picked up the nail polish Kiwi Kaos by Ulta3 and was swatching it when I realised I should actually do kiwi fruit nails to go with the name of the polish!
The design itself is pretty simple but I did watch a video by cutepolish to get an idea on how I should go about it and that helped a lot.
I don't know whether they look that much like kiwi fruits but they're fun anyway and I enjoyed doing them! I think if I was to redo them I'd made the white sections a little smaller so there was more green.
That's all for tonight, just a super quick post to show you these fun nails!
Thanks for reading.
- Melissa.
Labels:
fruit nail art,
nail art,
ulta3
Wednesday, June 10, 2015
Gradient / Grid Nail Art
These nails I'm showing you today are probably up there on my list of favourite nail art I've ever done, they're probably in the top five at this moment! It's hands down the best gradient I think I've ever done and while the grid I added isn't the straightest or neatest, it still looks really cool and eye catching.
I used the following polishes:
Sunset Pink - Ulta3
In My Back Pocket - OPI
Frangipani - Ulta3
I absolutely love this, I've never done a gradient so well and the grid just bought it all together and made the gradient look even smoother. The only annoying thing about this mani is that Seche Vite shrunk it; maybe it was combined with the matte top as well, but it's always a shame when it happens!
I just hope in the future that I can get better and doing straight lines and then I can do this design perfectly.
- Melissa.
Saturday, May 02, 2015
Splatter Nail Art
Today I have some new splatter nail art to share with you; it's one of the easiest designs to do and despite it being a bit messy it's still a lot of fun. I started with a base of Maybelline Color Show's Audacious Asphalt and used Babe It's Blue also by Maybelline and Corsican Rose and Party Shoes by Ulta3.
I have a feeling I've done a splatter with similar colours to this but I can't be bothered double checking. I tend to do either white or gray bases when it comes to splatter designs so it's probably something I've done before.
I really like this one though because the colours are all spread out and aren't too thick or bold. It worked out well!
Labels:
maybelline,
nail art,
splatter,
ulta3
Tuesday, April 21, 2015
Fan Brush Nail Art Inspired By The Nailasaurus
It's definitely been a while since I've done a proper post of some nail art but I'm back today with a design inspired by Sammy of The Nailasaurus who I've followed for years and am always in awe of because she produces such awesome nail art all the time.
I tried this method a while ago when I first got into nail art but it was not successful at all and I can't remember why but I managed to create something pretty cool this time around! I used one of the simple fan brushes that you get in pretty much every nail art brush set like this one here.
The polishes I used were:
Snow Me White - Sinful Colors
Mojito - Ulta3
Avenue Maintain - Essie
Purple Pumps - Ulta3
I really enjoy how it turned out, it reminds me of the dry brush method, which I guess it's a variation of really. And I'm very happy with the colours I chose too!
- Melissa.
I tried this method a while ago when I first got into nail art but it was not successful at all and I can't remember why but I managed to create something pretty cool this time around! I used one of the simple fan brushes that you get in pretty much every nail art brush set like this one here.
Snow Me White - Sinful Colors
Mojito - Ulta3
Avenue Maintain - Essie
Purple Pumps - Ulta3
I really enjoy how it turned out, it reminds me of the dry brush method, which I guess it's a variation of really. And I'm very happy with the colours I chose too!
- Melissa.
Labels:
essie,
fan brush,
inspired by,
nail art,
sinful colors,
ulta3
Sunday, January 11, 2015
Colourful Geometric Nail Art
Hi everyone! It's been a week since I last blogged but I've still been posting on instagram. I'm considering taking a break from writing blog posts and focusing on my instagram instead. I just don't think enough people are reading it and to me it seems a bit wasteful to spend my time and energy writing up posts. I'm also not happy with the appearance of my blog so maybe if I spend some time revamping and refreshing it I'll be fully into blogging again. But for now, I think I might just write the occasional post on new nail art designs I do (like this one) and still continue my bellabox reviews (maybe, I'm still unsure about those posts). Let me know what you think and what you'd like to see!
Onto the post today, for this one I used all Ulta3 nail polishes: Lily White, Black Satin, Strawberry Sundae, Block It Out, Palette Play, and Frog Prince.
I am beyond happy with how these turned out! I looove them. They took quite a while to fill in the spaces and do two coats of them and then clean up the white areas and neaten up the black stripes etc etc. But it was definitely worth it because I love them.
Thanks for reading! And hopefully I'll be posting soon, but make sure to follow my instagram for extra nail art that I won't be blogging about!
- Melissa.
Saturday, January 03, 2015
Australis Milky Way / Colourful Stripes
Today I have my first nail art of 2015. It's been extremely hot in Melbourne these past two days so yesterday after work I quickly smashed out this mani before my room became too hot to work in as I wanted to get a new post up this weekend.
It's a very simple mani using an Australis polish called Milky Way as inspiration for the stripes. I've wanted to use this glitter for a while now but every time I tried to I just couldn't think of a design that would go with it; I also had a bit of trouble applying it perfectly but this time round I started with a white base, applied one thick-ish coat of the glitter and then once dry, dabbed some polish onto a piece of paper and picked up and placed single bits of the glitter onto my nails to make it look packed on. I love how it turned out, it's such a nice glitter polish with the white base colour and a lot of colourful and different sized glitters.
I matched the stripes to four of the colours in the glitter using the following polishes:
Frog Prince - Ulta3
Manic Panic - Australis
Lacy Daisy - Ulta3
Block It Out - Ulta3
As you can see I applied a matte top coat which makes me love this mani even more! The matte glitter actually reminds me of jawbreakers when I think about it; that chalky sort of effect.
Thanks for reading!
- Melissa.
Tuesday, December 23, 2014
Plaid Stripes
Hello!
I'm not one hundred percent sure that these are actually plaid stripes but it was the best thing I could think of to call this post, but anyway, this is a design I haven't done before or even really thought of doing but I actually love how it turned out. All I did was paint some horizontal lines first in three different colours, alternating where the stripes were on each nail and then paint some vertical stripes using the same idea. So I guess it sort of is plaid, just without the over and under lapping of stripes.
For this design I used a base of Audacious Asphalt by Maybelline Color Show, and the stripes were Suzi Says Feng Shui by OPI, Lilac Bloom by Ulta3 and Devil's Advocate by Essie.
This design is so versatile and would work with any colour combo I reckon. It's so easy and eye catching!
That's all for today! Thanks for reading.
- Melissa.
Subscribe to:
Posts (Atom)