Hi everybody! Today's post is all about a recreation of an old favourite mani of mine. The original was done about two years and you can read and see all about it right here! I absolutely loved that design and recently I was going through some old photos and came across it again and decided to recreate it and kind of update it a bit.
This time round I used Sour Grape by Ulta3 and the same glitter polish, Silver Gleam by Maybelline, as well as Snow Me White by Sinful Colors.
I did a gradient and only used the purple to do the leopard print as opposed to using the colour and then black polish to outline. I think it looks simpler and neater and you can fit more pattern onto the nail.
I really love how this turned out compared to the original, not a bad upgrade! The original is definitely still one of my favourite designs though but it's nice to recreate something like this and I might consider going back and redoing some older designs every so often.
Thanks for reading!
- Melissa.
Showing posts with label maybelline. Show all posts
Saturday, February 27, 2016
Sunday, February 21, 2016
Reverse Stamping / Colourful Stripes
Ever since I bought an Uber Mat from UberChic Beauty, I've been trying out stamping and reverse stamping and making some easy decals. I've learnt from this that stamping is a lot easier when you can stamp the design onto something else and not straight onto the nail because sometimes it doesn't work out how you want and in that case, you just swipe some acetone over the design on the mat and start again! Life is incredibly easy with a silicone nail art mat!
For today's nail art I picked a simple design that I could do some reverse stamping with. If you're unfamiliar, reverse stamping is when you essentially colour in the stamping design to make a decal and then place it onto your nail, it can be done either on the stamper or on a silicone mat. There are heaps of designs like this on Instagram if you want to see some videos or tutorials on how to do it!
I wanted to do all the nails with reverse stamping but did not at all have the energy to reline the circles to be darker and then colour them in, so I went with an accent nail and my go to stripes.
I used Black Out by Sally Hansen, Sweet Clementine, and Babe It's Blue both by Maybelline, and a pink Kester Black polish I got in a BellaBox a while ago.
I love how this turned out! It made me really proud that I did something I'd wanted to do for a while but hadn't been able to until I got the Uber Mat. It's one of the best purchases I've ever made in relation to nail art so expect some more designs like this in the future!
Thanks for reading!
- Melissa.
For today's nail art I picked a simple design that I could do some reverse stamping with. If you're unfamiliar, reverse stamping is when you essentially colour in the stamping design to make a decal and then place it onto your nail, it can be done either on the stamper or on a silicone mat. There are heaps of designs like this on Instagram if you want to see some videos or tutorials on how to do it!
I wanted to do all the nails with reverse stamping but did not at all have the energy to reline the circles to be darker and then colour them in, so I went with an accent nail and my go to stripes.
I used Black Out by Sally Hansen, Sweet Clementine, and Babe It's Blue both by Maybelline, and a pink Kester Black polish I got in a BellaBox a while ago.
I love how this turned out! It made me really proud that I did something I'd wanted to do for a while but hadn't been able to until I got the Uber Mat. It's one of the best purchases I've ever made in relation to nail art so expect some more designs like this in the future!
Thanks for reading!
- Melissa.
Labels:
dots,
kester black,
maybelline,
nail art,
reverse stamping,
sally hansen,
stamping,
stripes
Wednesday, February 17, 2016
Sheer Tints / Glitter
Hi everyone! Today I have a design that's been around for a while since sheer tint polishes became a big thing. I'm going to start off by saying that this design is quite popular and I couldn't narrow down who first thought to put sheer polish over glitter, it could have been ermahgerdperlish on IG because that just sounds really familiar to me, but I did a bit of a search and couldn't find exactly who or when it was first done, so please excuse my lack of proper credit for this!
On to the post! I've wanted to do this design for a while with the OPI Sheer Tints since I've had them for over a year but just never got around to it, plus I hated using glitter polish because of how annoying it was to remove. But I recently got the UNT Peel Off Base Coat (which is the literal best nail related purchase I've ever made) which makes glitter removal ridiculously easy so there was no excuse to not try this design out!
I used all four of the OPI Sheer Tints and a glitter base of Maybelline's Silver Gleam. I tried to do the colours in order so that when it ended on one nail side, it matched up on the next nail.
I love the look of this and think it's pretty cool! And there's a lot of ways this design could go depending on how you want to apply the sheer tints over the glitter.
That's all for today, thanks for reading!
- Melissa.
On to the post! I've wanted to do this design for a while with the OPI Sheer Tints since I've had them for over a year but just never got around to it, plus I hated using glitter polish because of how annoying it was to remove. But I recently got the UNT Peel Off Base Coat (which is the literal best nail related purchase I've ever made) which makes glitter removal ridiculously easy so there was no excuse to not try this design out!
I used all four of the OPI Sheer Tints and a glitter base of Maybelline's Silver Gleam. I tried to do the colours in order so that when it ended on one nail side, it matched up on the next nail.
I love the look of this and think it's pretty cool! And there's a lot of ways this design could go depending on how you want to apply the sheer tints over the glitter.
That's all for today, thanks for reading!
- Melissa.
Labels:
glitter,
maybelline,
opi,
sheer tints
Saturday, February 13, 2016
Mermaid Scale Nail Art - Born Pretty Store Review
*This product was sent to me for review, all opinions are my own
I tried out these nail stickers which essentially are the same as all the nail vinyls and stencils that are really popular in the nail art world, so they work the same way. I completely forgot to take progress shots throughout this mani so apologies for that but I'll explain how I used them anyway!
I started with a base colour and applied a quick drying top coat over it so I could use the stencils sooner than if I didn't apply one. As they were stuck down on a plastic sheeting and were quite thin and sticky I was really worried that once I pulled the stencil off my nail, it'd pull all the polish up with it. Thankfully it didn't, but I still stuck the sticker flat on my hand to remove some of the stickiness before applying it to my nail. I think it helped a little bit.
Once the sticker was applied I then sponged on the four polishes I'd chosen to use which were: Berry Blue, Corsican Rose, Violet Rumble all by Ulta3, and Darling, You Are Fabulous! By Maybelline, which was the gold polish. I'm not a huge gold polish fan because I don't think it suits me, but this one is growing on me a bit!
Once I had done two quick coats of the sponged polish, I then carefully peeled the sticker off and up until this point I'd had huge doubts as to whether it'd work that well. But it turned out amazingly and I love it. Made me wish I'd done all the nails instead of just an accent.
I know that the photo below is super blurry, but since I'd forgotten to take progress shots I wanted to showcase the stencils themselves and didn't realise how blurry this photo was until after I'd removed the design, so oops! But look how gorgeous the stickers are! I love just looking at them.
I enjoy how they turned out because I've wanted to try this kind of design for a while but can't justify spending so much on other brands of nail vinyls because shipping isn't cheap to Australia from indie brands, so I'm glad I found these!
There are just one design of the many stencils/vinyls that Born Pretty Store has on offer and they're incredibly affordable if you wish to give them a go to see what all the fuss about these kind of stencils are! And don't forget you can use my code MEPUK31 for 10% off at checkout!
Thanks for reading.
Labels:
born pretty store,
maybelline,
nail art,
nail vinyls,
review,
splatter,
ulta3
Thursday, February 11, 2016
Blue / Grey Marble Nail Art
Today, as always, I have a simple design to show you all. There's nothing special about this design and I actually wrote this post once before but it didn't save or publish and I lost it all, so I'm a bit annoyed and therefore this one will really be just a short and simple post.
I did a simple water marble design on the accent nail and used some bunched up cling wrap to blot the grey polish onto the blue polish. Those polishes are Bestival Blue by Rimmel which is quickly becoming my new favourite blue polish and Impeccable Greys by Maybelline.
That's all for today, thanks for reading!
- Melissa.
Labels:
cling wrap,
maybelline,
nail art,
rimmel,
watermarble
Friday, November 20, 2015
Palm Tree Decals - Born Pretty Store Review
*This product was sent to me for review, all opinions are my own
The people at Born Pretty Store were kind enough to send me some of their nail art products to review, so first up are these summery water decals which I thought were really cute and easy to incorporate into nail art!
I chose the black decals because I already had a mani in mind when picking them. I've seen this design done by so many people that I always wanted to try it out but knew I'd never be able to hand paint the palm trees so when I saw these decals, I knew I had to get them.
To create my sunset base I used three polishes on a sponge to create a nice gradient. They were: Fierce N Tangy by Maybelline Color Show, In My Back Pocket by OPI, and OPI On Collins Ave by OPI. I then used those three colours on a small fan brush to blend the gradient together even more and to further even it out once I'd done that I used some acetone on the fan brush and lightly swept it across the nail to make it smooth and very blended. It turned out really well and I was very happy with it!
These were the set of decals I got, and as you can see there's a wide variety of designs to choose from but I went with the simple palm trees by themselves and the palm trees with the sun and grass. As usual, water decals are so simple to use as all you need to do is cut out the image you want, remove the plastic protector, dip the cut out in some water for 10-15 seconds and then gently remove the decal from the backing (if damp enough it'll simply slide off). Once that's done you can then carefully apply them to your nail using tweezers, flatten down, let it dry and then top coat it to protect it and help it last longer!
I added black polish to the middle and ring fingernails to help make it look like one picture as only the trees were the decal, whereas the index and pinky ones were all part of the decal and didn't need anything added to them.
I love how these turned out and I'm happy to have finally been able to do this design after loving all the ones I've seen over the years. It's one of my best gradients too.
Make sure you check out all the nail art products on the website and don't forget that I have a 10% off discount code to use when you buy anything from Born Pretty Store, the code is: MEPUK31.
Enjoy!
- Melissa.
Labels:
born pretty store,
gradient,
maybelline,
nail art,
opi,
review
Friday, November 13, 2015
Simple Splatter Nail Art
As you should all know by now, splatter nails are one of my favourite designs to do. Whenever I'm lacking in inspiration I always do some splatter nails to help out and I always feel happy with the outcome of them.
This time around though I did things a little differently. Instead of using straws like I always do I decided to use a bobby pin; specifically the bit where it curves at the end. Now I cannot for the life of me remember where I first saw this idea, but I know it was in a video and it was only mentioned in passing. I've tried searching Instagram and YouTube for where I think it might've come from but I can't find whatever video it was that I first heard it in so I don't know where this idea came from originally.
But anyway! Using a bobby pin for splatter designs has it pros and cons. It definitely made the design much neater because it doesn't result in huge blobs ending up on part of the nail and kind of ruining the whole thing. But on the downside it took foreverrrr. Sometimes it worked, sometimes it didn't and a lot of the time I couldn't get the positioning right so it ended up on the paper and nowhere near my nails. In the end though it was worth it because it's such a simple design. There are no big blobs, all the colours can be seen and it looks awesome!
I used the following polishes: Sapphire Siren by Maybelline Color Show, Secret Story, and Shake Your $$ Maker, both by Essie.
I'm definitely going to be using this method for future splatter designs because I really do love the outcome of it!
Thanks for reading.
- Melissa.
This time around though I did things a little differently. Instead of using straws like I always do I decided to use a bobby pin; specifically the bit where it curves at the end. Now I cannot for the life of me remember where I first saw this idea, but I know it was in a video and it was only mentioned in passing. I've tried searching Instagram and YouTube for where I think it might've come from but I can't find whatever video it was that I first heard it in so I don't know where this idea came from originally.
But anyway! Using a bobby pin for splatter designs has it pros and cons. It definitely made the design much neater because it doesn't result in huge blobs ending up on part of the nail and kind of ruining the whole thing. But on the downside it took foreverrrr. Sometimes it worked, sometimes it didn't and a lot of the time I couldn't get the positioning right so it ended up on the paper and nowhere near my nails. In the end though it was worth it because it's such a simple design. There are no big blobs, all the colours can be seen and it looks awesome!
I used the following polishes: Sapphire Siren by Maybelline Color Show, Secret Story, and Shake Your $$ Maker, both by Essie.
I'm definitely going to be using this method for future splatter designs because I really do love the outcome of it!
Thanks for reading.
- Melissa.
Labels:
essie,
maybelline,
nail art,
splatter
Sunday, November 08, 2015
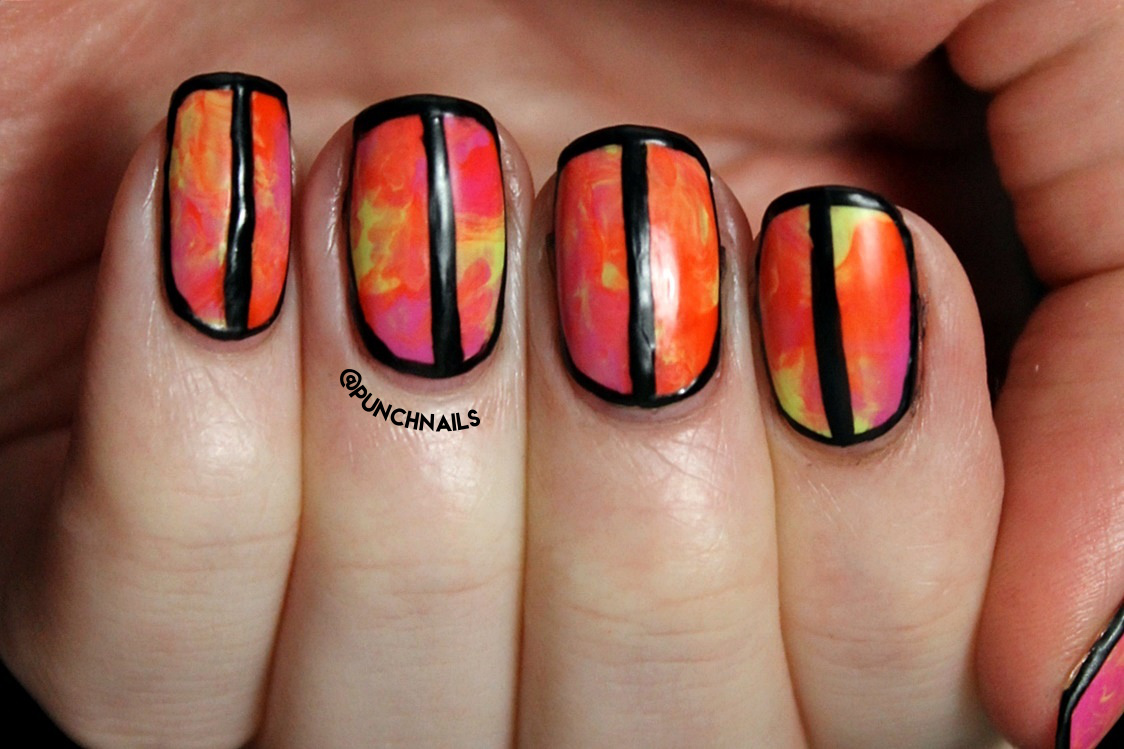
Swirled Nail Art w/ Black Accents
Recently I've been wanting to do borders around my nail art but haven't had the right design that I thought would look good with it. So the other day I did some swirled/marble nail art using cut up sandwich bags and thought it'd be perfect to do some black borders around it!
I used Orange Fix, Chic Chartreuse, and Fuchsia Petal all by Maybelline Color Show. I smooshed all of those colours together with cut up bits of a sandwich bag and I really love how it turned out! The green comes across as more of a yellow when mixed with the other colours, but that's okay.
I then went in with Black Satin by Ulta3 and carefully did some borders around each nail, and then thought it'd look even better with a line down the middle of the nail. Not sure which ended up better but I only took photos of the end result and everyone who saw my nails while I was wearing them absolutely loved them!
I think it looks really cool and makes it even more eye-catching! I topped it with Revlon's Matte Top Coat but it didn't make them completely matte, only dulled them down a bit so I think I might need a new matte top coat!
- Melissa.
I used Orange Fix, Chic Chartreuse, and Fuchsia Petal all by Maybelline Color Show. I smooshed all of those colours together with cut up bits of a sandwich bag and I really love how it turned out! The green comes across as more of a yellow when mixed with the other colours, but that's okay.
I then went in with Black Satin by Ulta3 and carefully did some borders around each nail, and then thought it'd look even better with a line down the middle of the nail. Not sure which ended up better but I only took photos of the end result and everyone who saw my nails while I was wearing them absolutely loved them!
I think it looks really cool and makes it even more eye-catching! I topped it with Revlon's Matte Top Coat but it didn't make them completely matte, only dulled them down a bit so I think I might need a new matte top coat!
- Melissa.
Labels:
matte,
maybelline,
nail art,
ulta3
Tuesday, September 15, 2015
31DC2015: Day 15 - Delicate
Today's prompt is another one that I'm not too fond of! I am no good at delicate designs and in the past two years I've always just done a variation of a French manicure. But this year I had zero ideas so I sat down and ended up with the mani below. I used some glitter, some dots and even did a border!
The base is Peach Bloom and the glitter is Orchid Bouquet both by Maybelline Color Show. It's a really lovely glitter top coat that I did one layer of and then sponged on the rest to get a lot on my nail without making it too thick! The purple border was done using the purple striper from Ulta3. I was going to do dots all over the nail but when I did the first two I thought that looked a lot nicer than doing them all over the nail.
I don't know whether this is very delicate but it's minimal and simple and I guess that's the same thing!
- Melissa.
The base is Peach Bloom and the glitter is Orchid Bouquet both by Maybelline Color Show. It's a really lovely glitter top coat that I did one layer of and then sponged on the rest to get a lot on my nail without making it too thick! The purple border was done using the purple striper from Ulta3. I was going to do dots all over the nail but when I did the first two I thought that looked a lot nicer than doing them all over the nail.
I don't know whether this is very delicate but it's minimal and simple and I guess that's the same thing!
- Melissa.
Labels:
31DC2015,
glitter,
maybelline,
nail art
Monday, September 14, 2015
31DC2015: Day 14 - Flowers
I'm not a huge fan of doing floral nail art. I've done some designs in the past but I've never been completely happy with the end result. I guess I'm just not a floral person. But I persevered and did a very simple, blobby type of design.
I started with a base of Bikini So Teeny by Essie, and for the flowers I used Fuschia Petal and Vivid Rose, with Peach Bloom in the centre and Chic Chartreuse all by Maybelline Color Show.
I quite like how this one turned out because I didn't care too much about the application and placement of the flowers. I just blobbed them on and went with it!
- Melissa.
I started with a base of Bikini So Teeny by Essie, and for the flowers I used Fuschia Petal and Vivid Rose, with Peach Bloom in the centre and Chic Chartreuse all by Maybelline Color Show.
I quite like how this one turned out because I didn't care too much about the application and placement of the flowers. I just blobbed them on and went with it!
- Melissa.
Labels:
31DC2015,
essie,
floral,
maybelline
Thursday, September 03, 2015
31DC2015: Day 3 - Yellow
So I'm already a day behind, but thank god for the back dating option on blogger I can make it look like I'm not! I did these nails using the 'sandwich bag' method where you blob on some polish and go to town on them with a square cut out of a sandwich bag so that it ends up being swirly and awesome!
I used Sinful Colors' Snow Me White and Maybelline's Fierce 'n Tangy. I normally do this design with a bunch of different colours but I quite like it when it's only focused on one main colour mixed with white. Very simple!
- Melissa.
I used Sinful Colors' Snow Me White and Maybelline's Fierce 'n Tangy. I normally do this design with a bunch of different colours but I quite like it when it's only focused on one main colour mixed with white. Very simple!
- Melissa.
Labels:
31DC2015,
maybelline,
nail art,
sinful colors
Friday, July 31, 2015
Purple/Green/Blue Mix n Match
I have a random mix n match design to show you tonight. I started off with the idea of doing some chevron patterns with purple glitter and a purple gradient. But then I realise that I always do purple gradients so I chucked in a green and blue polish and once finished I realised again that I always use this colour scheme.
But anyway, I love how it ended up even though it wasn't my original plan (thanks to being too impatient for the polish to dry, causing the nail vinyls to imprint in my white base and then deciding I should do something else). I've probably done something similar to this because I'm a bit of a one trick pony, but it's something at least!
The base is Snow Me White by Sinful Colors, the lovely glitter is Lavender Sparks by Maybelline Color Show and the three colours are Pamplona Purple by OPI, Suzi Says Feng Shui by OPI and Emerald Inten-City by Ulta3. They all make for such a lovely combo and honestly, if it's not obvious the green/purple/blue colour scheme is one of my favourites to use on my nails. They just work so perfectly together!
That's it for tonight, thanks for reading!
- Melissa.
But anyway, I love how it ended up even though it wasn't my original plan (thanks to being too impatient for the polish to dry, causing the nail vinyls to imprint in my white base and then deciding I should do something else). I've probably done something similar to this because I'm a bit of a one trick pony, but it's something at least!
The base is Snow Me White by Sinful Colors, the lovely glitter is Lavender Sparks by Maybelline Color Show and the three colours are Pamplona Purple by OPI, Suzi Says Feng Shui by OPI and Emerald Inten-City by Ulta3. They all make for such a lovely combo and honestly, if it's not obvious the green/purple/blue colour scheme is one of my favourites to use on my nails. They just work so perfectly together!
That's it for tonight, thanks for reading!
- Melissa.
Labels:
dotticure,
glitter,
maybelline,
mix n match,
nail art,
opi,
sinful colors,
ulta3
Monday, May 11, 2015
Mint & Coral Mix n' Match
Today I have a fun mix n' match mani that I had the inspiration to do recently. I love when coral and mint colours are paired together so I wanted to incorporate them into a mani as well as some touches of silver glitter, so that's what I did!
When choosing my colours though I realised I had thrown out my favourite coral polish because it was old and gloopy and pretty much empty so instead I went with Coral Heat by Maybelline Color Show and for the mint I chose Kelp Yourself by Sally Hansen.
I really do love how these nails turned out. I think I'm becoming better at planning out a mix n match design that works well together without being too over the top!
- Melissa.
When choosing my colours though I realised I had thrown out my favourite coral polish because it was old and gloopy and pretty much empty so instead I went with Coral Heat by Maybelline Color Show and for the mint I chose Kelp Yourself by Sally Hansen.
I really do love how these nails turned out. I think I'm becoming better at planning out a mix n match design that works well together without being too over the top!
- Melissa.
Labels:
dots,
glitter,
maybelline,
mix n match,
sally hansen,
stripes
Saturday, May 02, 2015
Splatter Nail Art
Today I have some new splatter nail art to share with you; it's one of the easiest designs to do and despite it being a bit messy it's still a lot of fun. I started with a base of Maybelline Color Show's Audacious Asphalt and used Babe It's Blue also by Maybelline and Corsican Rose and Party Shoes by Ulta3.
I have a feeling I've done a splatter with similar colours to this but I can't be bothered double checking. I tend to do either white or gray bases when it comes to splatter designs so it's probably something I've done before.
I really like this one though because the colours are all spread out and aren't too thick or bold. It worked out well!
I have a feeling I've done a splatter with similar colours to this but I can't be bothered double checking. I tend to do either white or gray bases when it comes to splatter designs so it's probably something I've done before.
I really like this one though because the colours are all spread out and aren't too thick or bold. It worked out well!
Labels:
maybelline,
nail art,
splatter,
ulta3
Tuesday, December 30, 2014
Inspired By... #12
Hello everyone!
I'm bringing my Inspired By... series back for this post as I couldn't come up with a creative name for this post as I have a lot of posts on dots. Today however, I'm inspired by another one of my phone cases, I think I've done three or four designs using inspiration from my phone cover and to be honest, that's partly why I buy the cases I do; for the inspiration!
I used a base of White On by Sally Hansen and the dots are E-nuf Is E-nuf by Essie and Turquoise Paradise by Maybelline Color Show.
I absolutely love how this turned out, it looks exactly like the case.
And here are the nails against the case, how spot on are they?!
I really enjoy this mani and I really enjoy doing spot on recreations of a pattern I've come across.
Hope you enjoyed this one, thanks for reading!
- Melissa.
I'm bringing my Inspired By... series back for this post as I couldn't come up with a creative name for this post as I have a lot of posts on dots. Today however, I'm inspired by another one of my phone cases, I think I've done three or four designs using inspiration from my phone cover and to be honest, that's partly why I buy the cases I do; for the inspiration!
I used a base of White On by Sally Hansen and the dots are E-nuf Is E-nuf by Essie and Turquoise Paradise by Maybelline Color Show.
I absolutely love how this turned out, it looks exactly like the case.
And here are the nails against the case, how spot on are they?!
I really enjoy this mani and I really enjoy doing spot on recreations of a pattern I've come across.
Hope you enjoyed this one, thanks for reading!
- Melissa.
Labels:
dotticure,
essie,
inspired by,
maybelline,
nail art
Tuesday, December 23, 2014
Plaid Stripes
Hello!
I'm not one hundred percent sure that these are actually plaid stripes but it was the best thing I could think of to call this post, but anyway, this is a design I haven't done before or even really thought of doing but I actually love how it turned out. All I did was paint some horizontal lines first in three different colours, alternating where the stripes were on each nail and then paint some vertical stripes using the same idea. So I guess it sort of is plaid, just without the over and under lapping of stripes.
For this design I used a base of Audacious Asphalt by Maybelline Color Show, and the stripes were Suzi Says Feng Shui by OPI, Lilac Bloom by Ulta3 and Devil's Advocate by Essie.
This design is so versatile and would work with any colour combo I reckon. It's so easy and eye catching!
That's all for today! Thanks for reading.
- Melissa.
I'm not one hundred percent sure that these are actually plaid stripes but it was the best thing I could think of to call this post, but anyway, this is a design I haven't done before or even really thought of doing but I actually love how it turned out. All I did was paint some horizontal lines first in three different colours, alternating where the stripes were on each nail and then paint some vertical stripes using the same idea. So I guess it sort of is plaid, just without the over and under lapping of stripes.
For this design I used a base of Audacious Asphalt by Maybelline Color Show, and the stripes were Suzi Says Feng Shui by OPI, Lilac Bloom by Ulta3 and Devil's Advocate by Essie.
This design is so versatile and would work with any colour combo I reckon. It's so easy and eye catching!
That's all for today! Thanks for reading.
- Melissa.
Wednesday, December 17, 2014
Splattered Floral Nail Art (Inspired By Chalkboard Nails)
Hello there everybody!
So today I have a post inspired by the very talented Sarah from Chalkboard Nails, particularly this tutorial on some easy splattered floral nail art. I loved this design from the moment I saw it and knew I wanted to try it out as it's something very different to what I'd normally do.
My base is My Vampire Is Buff by OPI with the flowers being Pink Boom and Coral Heat by Maybelline Color Show. When I added the leaves using Chic Charteruse I realised they were a bit too neon but I rolled with it anyway! I then added some small black dots to define the bigger flowers. And then to top it all off I used a Matte top coat. Oh and I only did two nails because I just couldn't get the sticky tape right for all four.
I quite like them! I haven't taken these off yet just because they're so nice and lovely and I'm kind of proud of them.
Make sure you check out the tutorial through the link to see how it's all done and maybe recreate it yourself!
Thanks for reading!
- Melissa
So today I have a post inspired by the very talented Sarah from Chalkboard Nails, particularly this tutorial on some easy splattered floral nail art. I loved this design from the moment I saw it and knew I wanted to try it out as it's something very different to what I'd normally do.
My base is My Vampire Is Buff by OPI with the flowers being Pink Boom and Coral Heat by Maybelline Color Show. When I added the leaves using Chic Charteruse I realised they were a bit too neon but I rolled with it anyway! I then added some small black dots to define the bigger flowers. And then to top it all off I used a Matte top coat. Oh and I only did two nails because I just couldn't get the sticky tape right for all four.
I quite like them! I haven't taken these off yet just because they're so nice and lovely and I'm kind of proud of them.
Make sure you check out the tutorial through the link to see how it's all done and maybe recreate it yourself!
Thanks for reading!
- Melissa
Labels:
floral,
inspired by,
maybelline,
nail art,
opi
Wednesday, December 10, 2014
Grey with Pastel Stripes
Hello lovelies!
Today is another very simple post just to get my blog through to the end of the year before I start fresh. I started with a grey base called Audacious Asphalt by Maybelline Color Show and striped on Lacy Daisy (yellow), Soft Voile (blue) and Pale Dahlia (very light pink) all by Ulta3.
The pink is so pale (hence the name I guess) that it barely shows up but you can sort of see it!
That's all for tonight's post, thanks for reading!
- Melissa.
Labels:
maybelline,
nail art,
stripes,
ulta3
Subscribe to:
Posts (Atom)