Showing posts with label review. Show all posts

Thursday, March 10, 2016

Favourite Nail Care Products

Hi everybody! If you follow me on Instagram you'll have seen that I'm on a bit of a nail art hiatus as I split a nail quite badly that resulted in me having to trim it down completely to the skin to let it grow out again. So for the time being I've just painted my nails all one colour so they can remain strong while my little baby pinky nail takes it's time catching up!

While that's happening though, I thought it would be a good idea to finally post about some of my favourite nail care products at the moment! I think I did a post similar to this way back when I first started my blog or within the first six months or so, which means it's definitely time for an update.


As you can see, these are a mix of moisturising products and some nail care tools. Let's go through them all (I will link what I can!)


I had wanted Lush's Lemony Flutter Cuticle Butter for so long but couldn't really justify spending that much for something so similar to the Burt's Bees Cuticle Cream which I had multiple little pots of. But one day I just thought screw it, there's a lot of product and it'll last till it expires so why the hell not. I hadn't been using any cuticle cream for a while so trying something new was also my reasoning. I absolutely adore this stuff, I love any citrus smells so this is amazing, it's so light and moisturising as well. I not only use it on my cuticles but also occasionally use it on my toes, feet, and lips if nothing else is within reach. I generally apply this before I go to bed because it doesn't soak in immediately so if I'm laying in bed watching TV it doesn't bother me if it's slightly greasy for a little bit.


I am yet to invest in a glass nail file, so please excuse me for a while for still using these simple emery boards. I've been using these Manicare ones for years, they're pretty cheap so replacing them is no big deal and hey come in a pack of 8. Despite the criticism for these type of files I've had no problem with them, they do a good job of filing and shaping my nails. I honestly believe the problem isn't with the filing utensil, but with how you file and I think I do a pretty decent job of filing my nails.

The second product in the above picture is this cuticle pusher also by Manicare. As you can see in the link it also comes with a cuticle trimmer but I never, ever use that on my cuticles. I've only used it once on my toenails but I would never put it anywhere near my fingernails. The cuticle pusher however is something I always use whenever I use a cuticle remover product. I first use the black pointy end to scrape the excess skin off my nails and then go in with the red end to gently push my cuticles back. It's a simple tool, but I think everyone needs one, it's soft but still solid enough to do it's job. 


These two products from Bliss Kiss, the Simply Peel Latex Barrier and the Simply Pure Hydrating Oil, are new additions to my collection but I liked them straight away. Simply Peel is amazing for doing messy nail art, like gradients or water marbles, with minimal clean up. It's easy to apply with the brush (and it's sent with a spare brush in case you wish to replace it) and even easier, and incredibly fun, to peel off after you've made a mess. I used to use basic latex for clean up but because that came in a pot with no brush or applicator it was a struggle to apply it smoothly and half of the pot dried up within a few months, so Simply Peel is amazing and simple and I love it.

The Hydrating Oil is just a really great cuticle oil. I originally got the starter kit in the link above, but when my pen ran out it basically just fell apart but not in the way that allowed me to refill it so I had to throw it out after trying desperately to fix it and now I just oil my nails once or twice a day from the dropper bottle. I've noticed a bit of a difference since using it, despite having a few breaks here and there. My nails were pretty good to begin with so there hasn't been a massive or huge difference so far, but it's definitely improved them and I know if I continue to use it, they're going to remain strong and lovely. Plus the crisp scent smells awesome and I love it. Just wish my pen hadn't broken because it was a lot easier to apply that way!


Thanks to Cristine from SimplyNailogical I discovered this little beauty that is the UNT Peel Off Base Coat. It's seriously amazing. It's not PVA Glue and doesn't have it in it as I believe most other peel off base coats do, but somehow it still peels off. It goes on clear and can be peeled off either straight away (if you mess up or are swatching) or whenever you want to peel it off. I have found that within a day and after a shower or two it starts to come off itself, but if you want your mani to last you shouldn't use this. I use it on days I want to do a lot of nail art or for glitter polish because we all know that's a bitch to get off normally. It's honestly so great and I'm in love with it!


This isn't my absolute favourite hand cream, I actually don't think I have one, but it's the hand cream that I keep on my bedside table. The smell is lovely and it's cheap so win, win. Hand cream is an essential in nail care and I always feel uncomfortable if my hands feel even a tiny bit dry so it's good to have a spare hand cream everywhere, I also keep one in my desk at work, in my car, and at my nail art table. 


Lastly is my trusty clean up brush! I go through these every few months and generally buy these ones or a variation of them. All you need is a small brush, I like to go for the angled ones as you can see. Other people like to use eyeliner/small eyeshadow brushes too. My nail art would not be as crisp and tidy if it weren't for these brushes!

So there's a few of my nail art favourites, I hope you enjoyed this post and I promise I'll be back with some more nail art soon, it took me a few days to write this post and already my pinky is start to develop a free edge again so give it another week or with a lot of TLC and it might have caught up to the others! 

Let me know if you have questions or comments about the products or anything in general. Thanks for reading!

- Melissa.

Saturday, February 13, 2016

Mermaid Scale Nail Art - Born Pretty Store Review


*This product was sent to me for review, all opinions are my own

Hi everyone! This is my last post for the products I was recently sent from Born Pretty Store. Today's post is all about some mermaid/fish scale, I won't call them vinyls exactly, more like stickers/stencils I think. So let's get started! 

I tried out these nail stickers which essentially are the same as all the nail vinyls and stencils that are really popular in the nail art world, so they work the same way. I completely forgot to take progress shots throughout this mani so apologies for that but I'll explain how I used them anyway!

I started with a base colour and applied a quick drying top coat over it so I could use the stencils sooner than if I didn't apply one. As they were stuck down on a plastic sheeting and were quite thin and sticky I was really worried that once I pulled the stencil off my nail, it'd pull all the polish up with it. Thankfully it didn't, but I still stuck the sticker flat on my hand to remove some of the stickiness before applying it to my nail. I think it helped a little bit.


Once the sticker was applied I then sponged on the four polishes I'd chosen to use which were: Berry Blue, Corsican Rose, Violet Rumble all by Ulta3, and Darling, You Are Fabulous! By Maybelline, which was the gold polish. I'm not a huge gold polish fan because I don't think it suits me, but this one is growing on me a bit!


Once I had done two quick coats of the sponged polish, I then carefully peeled the sticker off and up until this point I'd had huge doubts as to whether it'd work that well. But it turned out amazingly and I love it. Made me wish I'd done all the nails instead of just an accent. 

I know that the photo below is super blurry, but since I'd forgotten to take progress shots I wanted to showcase the stencils themselves and didn't realise how blurry this photo was until after I'd removed the design, so oops! But look how gorgeous the stickers are! I love just looking at them.


I enjoy how they turned out because I've wanted to try this kind of design for a while but can't justify spending so much on other brands of nail vinyls because shipping isn't cheap to Australia from indie brands, so I'm glad I found these!

There are just one design of the many stencils/vinyls that Born Pretty Store has on offer and they're incredibly affordable if you wish to give them a go to see what all the fuss about these kind of stencils are! And don't forget you can use my code MEPUK31 for 10% off at checkout!

Thanks for reading.

Thursday, February 04, 2016

Teardrop Rhinestones - Born Pretty Store Review


*This product was sent to me for review, all opinions are my own

Today I have a review of some rhinestones I received from Born Pretty Store. In this post I'm focusing on only one of the rhinestones as that's all I used for this design, but I'll still be reviewing the whole wheel.


As you can see above, this rhinestone wheel has two of each design and they range from bows, to teardrops, to stars, to flowers and the standard square and circle studs. They also have a slight holo, shimmery look them which I really liked. You get 200 pieces for $2.25AUD

For today's design, I sponged on a few different colours, then dropped some black polish into a small cup of water and sprayed it with a hand sanitizer to spread the polish and create a water spotted design (I think that's what it's called). I did this design with the intention to use only the teardrop rhinestones, because I thought the design and the rhinestone would go really well together. 


I think the design really worked out well and the rhinestones were so easy to pick up with a dotting tool and a tiny bit of clear polish on both the dotting tool and where I placed the rhinestone on the nail. They did slide around a bit, but once the polish underneath was dry they stayed put and didn't budge till I wanted to remove them. And if you're very frugal, they can be used again if you take care when removing them from the nail. I didn't top coat after placing them so I don't know if they change or dull down with a top coat.

This is absolutely one of my favourite designs of the year so far, it looked so pretty and delicate in real life and the colours were more vibrant. I'd never done a design like this before and was happy with how it turned out. I think the rhinestones added that finishing touch to them because it definitely looked a bit dull without them!

Don't forget you can use my code MEPUK31 for 10% off the Born Pretty Store website if you'd like!

Thanks for reading.

- Melissa.

Friday, January 29, 2016

Colour Changing Nail Polish - Born Pretty Store Review


*This product was sent to me for review, all opinions are my own

Nail polish that changes colour has been around for quite a while, but I only recently used it after being sent this polish in 103 from Born Pretty Store. I was skeptical, but also excited to try it out and see how well it actually worked.


This is what the polish looked like once it had dried and I'd top-coated it. It did however, as you can see in the photo below of the bottle, go on my nails purple and then dry to a light blue with a purple tinge at the free edge. This is because it turns blue when warm and purple when cold. So you can tell my nails/fingers were warm when I applied it.


Firstly, here are some photos of my nails after they were dipped in hot water, this shade of blue is actually one of my favourites, so I was happy my colour choice.


And secondly, these are my nails are dipping them in cold water. It's a really nice shade of purple, kind of like a dark lilac I guess.


And here is my attempt at half and half, but I didn't do it very evenly, still a cool effect though!


This polish is pretty cool and definitely exceeded my expectations. I had a lot of fun showing everyone how it worked and just staring at my nails every time I washed my face or hands or had a shower. It was a good week when I was wearing this polish! The novelty does wear off after a while, but I'd love to get another colour and see the change!

Here's a video I posted to my Facebook page of Punch Nails.


Posted by Punch Nails on Saturday, January 16, 2016

Don't forget I have a 10% off code: MEPUK31 for the Born Pretty Store website!

Thanks for reading.

- Melissa.

Wednesday, January 13, 2016

Strawberry Water Decals - Born Pretty Store Review


*This product was sent to me for review, all opinions are my own

New year, new products to review! Born Pretty Store kindly sent me these cute strawberry decals recently and I've been wearing them on my nails for a good week now. I've posted a bunch of times about water decals and as always, these were simple to use and easy to apply. The only time I struggled a bit was with the very small strawberry in the middle of my index finger because it was quite tiny and hard to grip properly with the tweezers, but as you can see I got there in the end.


I had no real plan when applying these, I just wanted to use all the different sizes and styles of decals that were on the sheet. I will admit I don't love the strip of strawberries that the decal offers that are on my middle finger. Maybe I could have utilised them differently or applied them on the length of my nail instead of the width but I just don't love that nail. The heart one of my ring finger is pretty cute though and so are the little bunches on my other nails. 

Overall I don't love these decals as much as I've loved some previous ones. Looking at the link above where you can purchase them from, I wish I had chosen the sheet with all different kinds of fruits on them. I think that would've been a lot more fun and something I would probably use beyond this review as well. Might have to purchase those ones!


Ultimately, just like other water decals, they're easy to use if you want simple nail art that people will still comment on and even question if you did them yourself. And you can definitely mix it up and wear them with other colours or patterns or just as an accent. The heart would be pretty cute with a Valentine's Day design actually!

Don't forget I have a code MEPUK31 if you want 10% off at checkout on the Born Pretty Store website!

- Melissa.

Thursday, December 03, 2015

Floral Decals - Born Pretty Store Review


*This product was sent to me for review, all opinions are my own

Today's review is on these gorgeous water decals from Born Pretty Store! The pack come with two different designs, so you've got a bit of choice on which decals you might want to wear or incorporate into your nail art! 

I chose to use to purple geometric looking decals but only apply them to two nails as I wanted them to be a feature and not the whole design. But I also didn't want the other two nails to overtake the decals so I chose to pair them with Ulta3's Losta Fun which I think matched them quite well!


I used a white base under the decals as the non-coloured parts were clear and I wanted them to stand out on my nail. They were slightly difficult to apply though and it took me three tries to get a decal on my ring finger because it kept folding in on itself or not sitting straight on the nail and just all around wasn't working. I had no problem with the middle finger though! That one went on easily and it's my favourite design of the whole thing.

I really do love these decals, I wore them for about a week with only slight tip wear which is normal, and they were easy to remove with polish remover just like normal nail polish! As with the previous decals I posted about, they can be cut to the size of your nail or you can easily clean up the excess around the cuticles with some acetone.

Don't forget you can use my 10% discount code: MEPUK31 at checkout!

Thanks for reading.

- Melissa.

Sunday, November 29, 2015

Colourful Square Water Decals - Born Pretty Store Review


*This product was sent to me for review, all opinions are my own

I'm back with another review of some water decals from Born Pretty Store! These decals caught my eye straight away because they were so colourful and geometric and I loved how they looked in the pictures. I was also curious to see how they transferred onto the nails because you had to cut them to fit instead of them being nail shaped already.

Turns out it wasn't that difficult! I cut the decal into rectangles that were about the width of my nail, I didn't worry about the length too much because I knew I'd just acetone to clean up the extra bits. But if you have short nails and want to get the most use out of decals like this then I would recommend cutting them to the length of your nail as well. You won't waste a lot that way.


It was really easy to clean up the excess decal around the cuticles and tip of the nail because the decals are thin. However I wish I had used a white base underneath because the colours weren't as solid or vibrant as they were on the paper backing.


I also had a few issues with lumps under the decals, I wasn't sure whether it was water or air or just the way I put them on but they didn't flatten out. I also wasn't too keen on some of the colour combination but that's mostly because I don't like the colours red or brown and they're the biggest squares on some of the decals.

So overall these aren't my favourite patterned decals but I do like that I could cut them how I wanted to, which made it easier to apply them and easier to shape them and clean up.

Don't forget you can use the code MEPUK31 for 10% off at checkout on their website!

- Melissa.

Friday, November 20, 2015

Palm Tree Decals - Born Pretty Store Review

*This product was sent to me for review, all opinions are my own

The people at Born Pretty Store were kind enough to send me some of their nail art products to review, so first up are these summery water decals which I thought were really cute and easy to incorporate into nail art!

I chose the black decals because I already had a mani in mind when picking them. I've seen this design done by so many people that I always wanted to try it out but knew I'd never be able to hand paint the palm trees so when I saw these decals, I knew I had to get them.

To create my sunset base I used three polishes on a sponge to create a nice gradient. They were: Fierce N Tangy by Maybelline Color Show, In My Back Pocket by OPI, and OPI On Collins Ave by OPI. I then used those three colours on a small fan brush to blend the gradient together even more and to further even it out once I'd done that I used some acetone on the fan brush and lightly swept it across the nail to make it smooth and very blended. It turned out really well and I was very happy with it!


These were the set of decals I got, and as you can see there's a wide variety of designs to choose from but I went with the simple palm trees by themselves and the palm trees with the sun and grass. As usual, water decals are so simple to use as all you need to do is cut out the image you want, remove the plastic protector, dip the cut out in some water for 10-15 seconds and then gently remove the decal from the backing (if damp enough it'll simply slide off). Once that's done you can then carefully apply them to your nail using tweezers, flatten down, let it dry and then top coat it to protect it and help it last longer!


I added black polish to the middle and ring fingernails to help make it look like one picture as only the trees were the decal, whereas the index and pinky ones were all part of the decal and didn't need anything added to them.

I love how these turned out and I'm happy to have finally been able to do this design after loving all the ones I've seen over the years. It's one of my best gradients too.

Make sure you check out all the nail art products on the website and don't forget that I have a 10% off discount code to use when you buy anything from Born Pretty Store, the code is: MEPUK31.

Enjoy!

- Melissa.

Tuesday, July 28, 2015

Nail Stud Wheel - Lady Queen Beauty Review

*This product was sent to me for review, all opinions are my own

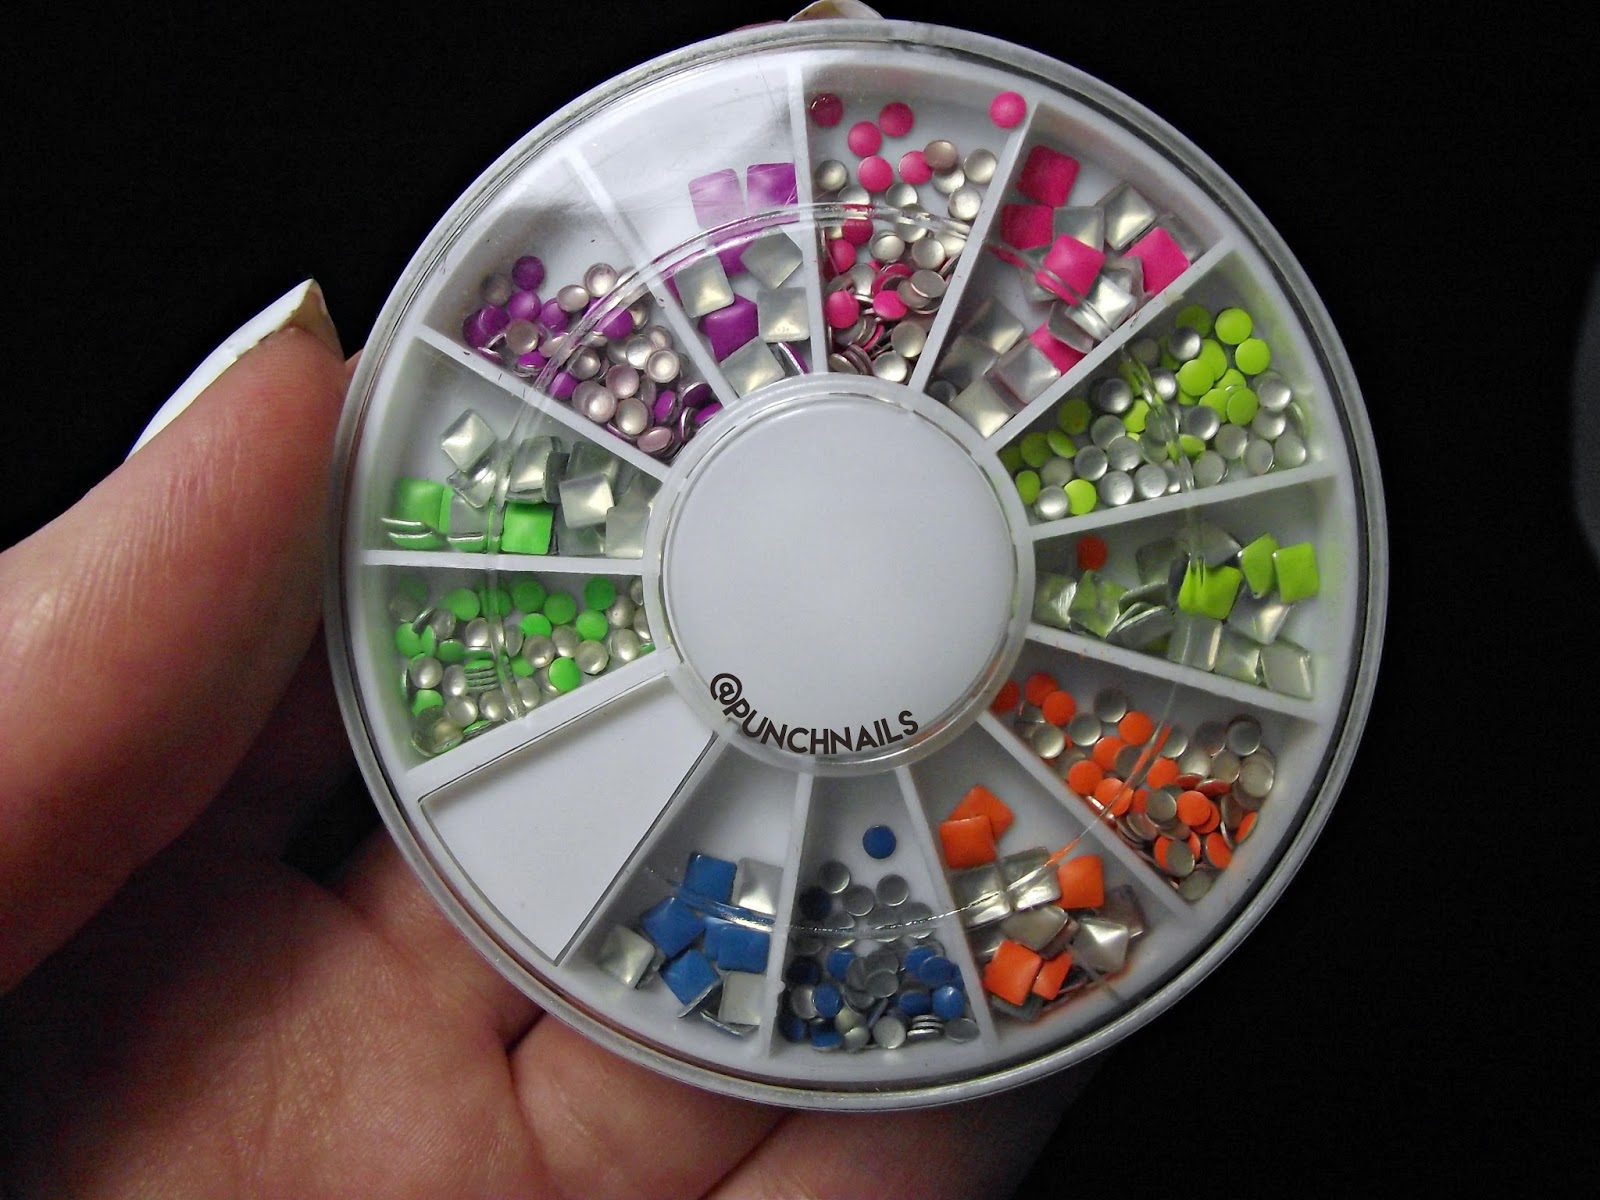
Hi everyone! Tonight I have another review of a product that the lovely people at Lady Queen Beauty sent me. This time around it's a colourful array of circle and square shaped nail studs! I've been weary of using nail studs because I think they sometimes look too big on my nails, but so many people tell me they look great and that I have nothing to worry about so I continue to experiment and see what I can create with them.


There are six fluorescent colours in the wheel and each colour comes in small circles and squares so there's a lot of choice as to what design and combination you could do. I chose something simple that combined both sizes and two colours.


As you can see I had to cut the top studs in half, which I didn't think about before I started doing the nails. I did a pretty bad job of cutting them as they're uneven but they cut quite easily if you hold them with tweezers and use small scissors. Now that I look at the pictures, I realise I should have filed the corner down and evened it out, but oh well. You win some, you lose some. It still looks pretty great.


The studs stuck quite easily to my nails with a little bit of clear top coat underneath and a thick layer of top coat once they were all applied and they stayed on for a few days, with the exception of the half squared ones as the edges got caught on things and came off.

My favourite studs are definitely the circles, I didn't love the squares because they did feel a bit too big on my nails but looking at the pictures, they don't come across as too large. 

Overall, I love the stud wheel and at only $3.32AUD it's a bargain because of how many studs you get and all the colours they come in! And don't forget you can use the following code EXLC15 at checkout for 15% off with free shipping worldwide!

Thanks for reading!

- Melissa.

Tuesday, June 09, 2015

Iridescent Glitter Gradient - Born Pretty Store Review

*This product was sent to me for review, all opinions are my own

Tonight I have another review of glitter from Born Pretty Store, this time it's some irregular shaped, shiny and iridescent glitter that I fell in love with when I first saw it on the website. There were so many colours to choose from that I wish I'd been able to get all the colours mixed together in one little pot but because that couldn't happen, I picked number ten, a light blue glitter that also reflects green and dark blue in certain lighting.


Look at how awesome those colours are!!


I had to take these photos outside because my lighting inside just didn't do the colours justice, they'd turned out bleak and dark but outside they were so bright and shiny and all different colours that I knew I couldn't use the photos I took in my lightbox. So I'm very happy I noticed how nice they looked outside!

I had a bit of a problem with applying them and keeping them stuck to the nail because they are a bigger shaped glitter, so that was annoying but applying a thick enough top coat sort of helped with that. However, I did find myself picking at the glitter absentmindedly because they were poking up and sticking out from the nail.

All in all, I love the colours and the way the glitter looks against the black base but they weren't massively practical for me to wear on my nails for more than a day because I did pick at them. 

Don't forget to use the code MEPUK31 for a 10% discount when you shop for anything on the Born Pretty Store website!

- Melissa.

Sunday, May 31, 2015

May BellaBox Review

Hello everyone, I'm back with another bellabox review! I haven't done one of these since February because of a combination of me being lazy and not loving the products recently, but May has been a great month and I'm doing things a little differently today to help motivate me and perk these posts up! Plus I've missed reviewing beauty products and writing blog posts so here we go.

The theme for this month's box was a collaboration with Pop Sugar and everyone received either a contour or a highlighter pencil by Chella.


As you can see I got six products and two of those are full sized. So to begin with I was quite happy about that.

Real-U Control + Face Gel RRP $50.00 for 100ml

I was instantly drawn to this product because I've never heard of this brand before and the back of the tube stated in big letters that the product contains no salicylic acid or benzoyl peroxide which is awesome because we all know I'm allergic to salicylic acid! I've been using this for the past week and I don't mind it. Yes my face still gets oily (when won't it) but it definitely does control it and delays how quickly it happens. I use this both morning and night underneath my normal moisturiser because it does make my skin feel a little tight and I don't want my skin to think it's undermoisturised if that makes sense, plus it's only a gel so it does need the extra. I'm seriously considering trying out their other products to go along with it.

Chella Ivory Lace Highlighter Pencil RRP $24.95

This is one of the products that everyone would have received in their boxes, the other was the contour pencil which my mum received in hers, so I'm very happy I have both of them. If you look at the tip of the pencil you can see it's definitely an ivory colour. I would love it more if it was brighter and lighter because against my pale skin it's not much of a highlighter for me but it's a good base for other highlighters!

Impulse Romantic Spark RRP $4.99 for 57g

This is a cute little sample of 'perfume in a spray' from Impulse. I quite like how it smells even though it does smell a little mature but I don't hate it. I think it's a great substitute for perfume if you don't want to wear something heavy or even if you're a little allergic to it. Plus the real size is a lot cheaper than perfume.


Palmer's Cocoa Butter Formula Moisture Rich Night Cream RRP $14.99 for 75g

I was very worried about this product when I read the words 'moisture rich' but I was pleasantly surprised at how much I like this moisturiser. I've been using it most nights and while it is a little bit greasy, it's not as bad as most thicker moisturisers I've used in the past. Combined with face oil and the control gel above it works really well at making my skin smooth and soft. I really like it and I'm super happy I've found a great night cream that I don't hate!

Eye Of Horus Goddess Pencil RRP $30.00

I've never heard of this brand before but it's nice to receive things like that and discover new brands and products. I'm not fond of the colour, I know emerald suits blue eyes but I didn't love how it looked when I used it and smudged it out. But I'll give it another go and see if I can incorporate it into my eye make up without making it look over the top or like I've been punched in the face. It's a great addition to any make up collection though.

Sunescape Hydrating Gradual Tan Extender RRP $33.00 for 200ml

I can't give a proper review on this product because I haven't used it yet but I've read all positive reviews so hopefully it works well for me and I love it as much as others do.

Overall I loved the May bellabox, for a while there I was doubting whether I'd continue my subscription after this month considering I've been getting this for a year now but I'm looking forward to June's box and I'm sure it's going to be just as great.

Thanks for reading!

- Melissa.

PS let me know if you like the layout of these posts like this with pictures instead of just a numbered list of the products!

Metal Pattern Water Decals - Born Pretty Store Review

*This product was sent to me for review, all opinions are my own

Hi everyone! I have another review of a Born Pretty Store product. This time round it's full sized water decals in a metal type design. I chose these because I wanted to try out a full nail decal and water decals are the easiest to use and reshape to a nail, I also thought the pattern wasn't something I'd normally go for so I went out of my comfort zone a bit with this choice.

For $2.49AUD you get one sheet of fourteen decals with seven different sizes, but even if those sizes aren't right for your nails you can easily use remover or acetone once they've been applied, to shape them to your nail size because they're thin and have no sticker or foil backing.


These decals are pretty cool and with a top coat they last as long as you want them to pretty much. You've just got to be a little careful when applying them and smoothing out the bumps because they can easily tear when they're still a little damp and stuck down. My favourite pattern is definitely the silver one, I'd wear that one again for sure.

Definitely will consider purchasing some of the other patterns that these come in and if you do too then don't forget to use my 10% off discount code MEPUK31 at the checkout!

- Melissa.

Saturday, May 09, 2015

Glitter Placement Nail Art - Born Pretty Store Review

*This product was sent to me for review, all opinions are my own

I absolutely looove glitter placement nail art so when I saw this glitter I knew it'd be perfect to finally do my own glitter placement. This inspiration came from polishallthenails on Instagram, ever since I started following her a while ago all I've wanted to do is try it out for myself. It's not as perfect because I honestly didn't have the will and strength to place them all evenly but it's still an awesome effort and I love how they look!


As you can see the hexagon glitter came in three colours, blue, pink and gold and there's a lot of it for only $2.45AUD so this stuff will last me forever! What a great bargain.


The macro shot above shows how sloppy I was with my placement but it also shows how cool it all looks. I love how it looks in real life and how shiny and bright it is!

These glitter pots are definitely worth it if you want to try out glitter placement yourself or if you just generally want some glitter for whatever reason. I'm seriously considering purchasing some of the other colours and seeing what other shaped glitters they have on their website. Don't forget to use the code MEPUK31 for 10% off at checkout!

- Melissa.