Tuesday, September 01, 2015

31DC2015: Day 1 - Red

Another year, another 31 Day Challenge! I don't have a lot of faith in myself to complete the challenge this year just because I'm busier but also somehow lazier than the past two years, but I'm going to give it a good go anyway because why the hell not!?

If you know me at all, you'll know I hate the colour red so I always start the challenge annoyed. But today I just did something very simple and easy and since it's been a while my photo taking skills were pretty average.


I used a base of Ulta3's Pepper Pot and then used Black Out by Sally Hansen for the dry brush method. It's not the greatest but I didn't really want to spend too much time on red. It only gets better from here on anyway!

- Melissa.

Wednesday, August 19, 2015

My First Stamping Experience - Born Pretty Store Review

*This product was sent to me for review, all opinions are my own

Hi everyone! I recently got some stamping products from Born Pretty Store. I've wanted to try out stamping for so long but just never knew where to start or what to get. So when I was offered to review some more products, I chose some stamping products! Here's what I picked out: Double sided stamper with scraper, one small plate, and a larger plate. In this post I'll be reviewing the stamper/scraper and the large plate.


The stamper is double sided, with the larger one being 22mm and the smaller end being 15mm and costs $4.04AUD. The plate below comes in at $7.50AUD.


I spent quite a bit of time testing different polishes and stamping the different designs on paper and my bare nails, just to get a feel of the whole stamping thing. I then, after getting slightly frustrated, watched a few YouTube videos on stamping (I can't find the specific ones I watched, but there are plenty out there to help) to help me get the hang of it even more. And they helped a lot because I realised I wasn't using enough polish or scraping hard enough.

Once I got the hang of it, I realised how simple it was, of course some polishes work better than others and some patterns pick up better than others, but generally it was all working out well. I found the best combo, and the combo I used in this post, to be the heart design with Bubblegum Pink by Sally Hansen


Of course it's not perfect, there are some parts that didn't pick up or transfer that well but all in all I'm really pleased with how it turned out! The pattern is really cute and not one I was first drawn to but when I tested it out, I absolutely loved it. All the patterns are fun and different and can be used in so many ways. I'd love to give reverse stamping a go and see how/if that works out.

Here's another picture from the first time I tested out the products, not too bad for a first stamp!


While I'm not the best at stamping, I think these were some really great products to start with as they were easy to use and came with a lot of designs to choose from. I'm excited to try out more polishes and find the absolute best combination that I can that'll make the end result look amazing. 

I definitely recommend the stamper to any beginner because you can use it instantly without having to prime it or whatever it is you need to do to some stampers. And once you get the hang of scraping the right way, it seems like such a breeze!

Don't forget you can use the code MEPUK31 at checkout for 10% off your purchase!

Thanks for reading!

- Melissa.

Friday, July 31, 2015

Purple/Green/Blue Mix n Match

I have a random mix n match design to show you tonight. I started off with the idea of doing some chevron patterns with purple glitter and a purple gradient. But then I realise that I always do purple gradients so I chucked in a green and blue polish and once finished I realised again that I always use this colour scheme.

But anyway, I love how it ended up even though it wasn't my original plan (thanks to being too impatient for the polish to dry, causing the nail vinyls to imprint in my white base and then deciding I should do something else). I've probably done something similar to this because I'm a bit of a one trick pony, but it's something at least!


The base is Snow Me White by Sinful Colors, the lovely glitter is Lavender Sparks by Maybelline Color Show and the three colours are Pamplona Purple by OPI, Suzi Says Feng Shui by OPI and Emerald Inten-City by Ulta3. They all make for such a lovely combo and honestly, if it's not obvious the green/purple/blue colour scheme is one of my favourites to use on my nails. They just work so perfectly together!

That's it for tonight, thanks for reading!

- Melissa

Tuesday, July 28, 2015

Nail Stud Wheel - Lady Queen Beauty Review

*This product was sent to me for review, all opinions are my own

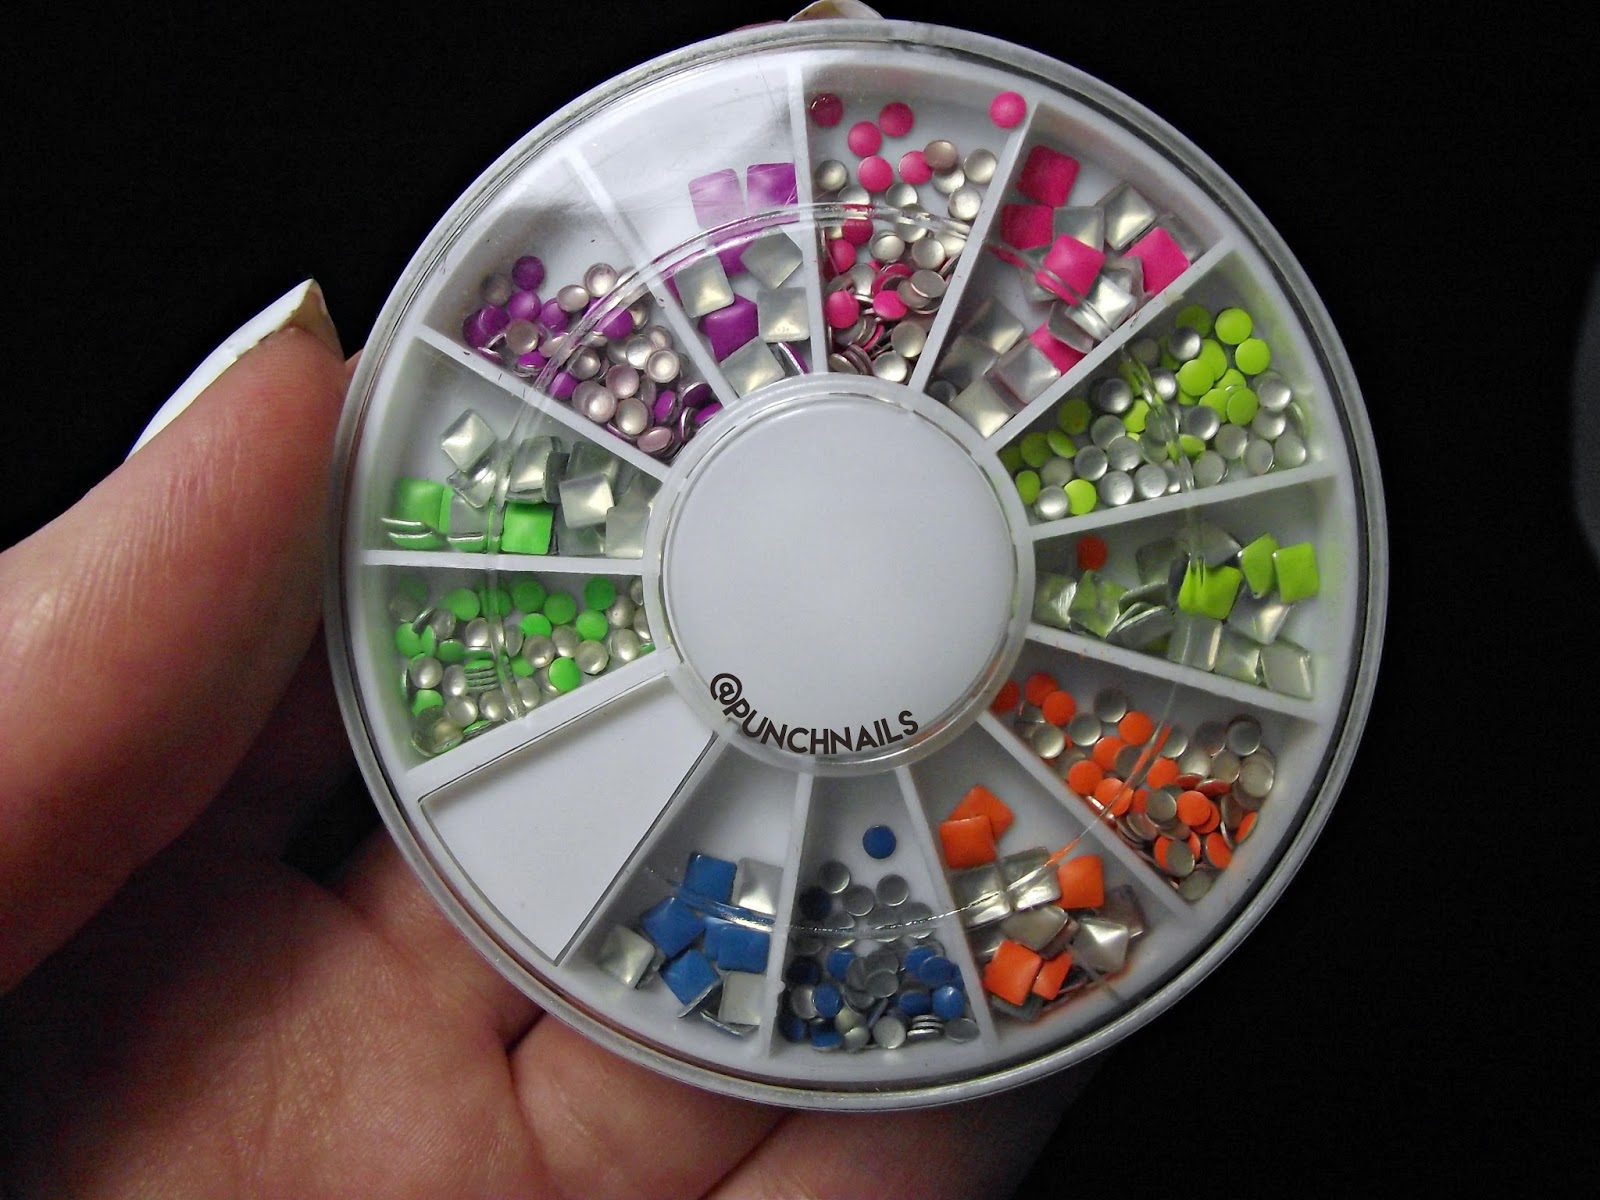
Hi everyone! Tonight I have another review of a product that the lovely people at Lady Queen Beauty sent me. This time around it's a colourful array of circle and square shaped nail studs! I've been weary of using nail studs because I think they sometimes look too big on my nails, but so many people tell me they look great and that I have nothing to worry about so I continue to experiment and see what I can create with them.


There are six fluorescent colours in the wheel and each colour comes in small circles and squares so there's a lot of choice as to what design and combination you could do. I chose something simple that combined both sizes and two colours.


As you can see I had to cut the top studs in half, which I didn't think about before I started doing the nails. I did a pretty bad job of cutting them as they're uneven but they cut quite easily if you hold them with tweezers and use small scissors. Now that I look at the pictures, I realise I should have filed the corner down and evened it out, but oh well. You win some, you lose some. It still looks pretty great.


The studs stuck quite easily to my nails with a little bit of clear top coat underneath and a thick layer of top coat once they were all applied and they stayed on for a few days, with the exception of the half squared ones as the edges got caught on things and came off.

My favourite studs are definitely the circles, I didn't love the squares because they did feel a bit too big on my nails but looking at the pictures, they don't come across as too large. 

Overall, I love the stud wheel and at only $3.32AUD it's a bargain because of how many studs you get and all the colours they come in! And don't forget you can use the following code EXLC15 at checkout for 15% off with free shipping worldwide!

Thanks for reading!

- Melissa.

Monday, July 20, 2015

Watermelon Nail Art

I have a quick post tonight to show you some watermelon nail art I did over the weekend! It's nothing special and I don't really love them that much; they definitely could be better but they're still fun and it's my first time doing this design, so I can only improve from here, right?


The red base is Pink Colada by Ulta3, the dark green is Don't Mess With OPI by OPI, the white is Snow Me White by Sinful Colors and the lighter green is a mix of the OPI shade and Mojito Madness by Essie.

I think next time I would use a lighter shade of pink but I know that this colour would be perfect for some strawberry nail art!

Thanks for reading!

- Melissa.

Thursday, July 16, 2015

Nail Foils - Lady Queen Beauty Review

*This product was sent to me for review, all opinions are my own


Hey everyone! I was recently contacted by the lovely people at Lady Queen Beauty, an online store that sells everything from nail art products, to hair accessories, to cute novelty homeware items, to review some nail art products. I was more than happy to choose a few products to review for them, and they were kind enough to supply me with a 15% discount on any products for my followers: EXLC15 and free shipping worldwide is available too!

The first item I chose was the amazing nail foils featured in tonight's post. I've always admired nail foils from afar but have been too afraid to try them out because they looked complicated, messy and a bit of a nuisance. But I couldn't go past this opportunity to try them out and I'm super glad I chose them because I love the end result! I definitely regret not trying these earlier.


As I wasn't familiar with the application of nail foils I watched a couple of videos to see how I should use them. I first watched this video and that was super helpful but I wasn't sure I wanted to apply them as one strip over the whole nail, so I checked out this video by Jessie from Nailed It NZ and knew that's how I wanted to apply the foils. And they applied very easily! I did realise that I didn't have any 'nail foil glue' but instead I used PVA glue and it worked just as well as how I imagine the other glue would have. 

As you can see above, the foil pattern has so much colour and dimension to it. I fell in love with it when it arrived and I fell more in love with it when I pulled it out of the container and stuck it under the light. Look at the colours in the second picture! They're amazing. I did try out applying the foil all over my nail for a smooth, solid design but I got too eager and the glue hadn't dried enough so not all of it stuck down so I stuck with the messy look.


The photos don't even do the colours justice, they're so shiny and sparkly in different lighting and I've constantly caught myself just staring at my nails and moving them around to see all the different colours! They're so distracting!


My package from Lady Queen arrived within a few weeks and if you want to check out the range of foils available, you can find them here! There are so many to choose from and I can't wait to buy some more and experiment with different combinations. I may become obsessed with nail foils now.

Don't forget that using the code EXLC15 at checkout for 15% off your purchase! My next review for Lady Queen will be on a nail wheel of colourful studs, so stay tuned for that in the next week or so.

Thanks for reading!

- Melissa.

Monday, July 06, 2015

Kiwi Fruit Nail Art

I have a quick post tonight on these kiwi fruit nails that I did on a whim last week. I recently picked up the nail polish Kiwi Kaos by Ulta3 and was swatching it when I realised I should actually do kiwi fruit nails to go with the name of the polish! 

The design itself is pretty simple but I did watch a video by cutepolish to get an idea on how I should go about it and that helped a lot.


I don't know whether they look that much like kiwi fruits but they're fun anyway and I enjoyed doing them! I think if I was to redo them I'd made the white sections a little smaller so there was more green.

That's all for tonight, just a super quick post to show you these fun nails!

Thanks for reading.

- Melissa.